Rolling Your Standard Costs
It's that time of the year, fall is in the air, pumpkin spice lattes are at Starbucks and the stores are filled with Christmas decorations. What better time to think about standard costs!
Microsoft Dynamics 365 Business Central (BC) has several costing methods but standard cost is the one that needs yearly attention. Costs have increased, charges have increased but what about your standards. This is the time of the year where many teams are starting to look at their variances and considering how to adjust standard costs to be more in line with actual costs over the last period. It’s recommended that this evaluation take place yearly, any more often and you should consider a specific costing method such as FIFO as your costing method. Note that changing costing methods is a labor-intensive process that must involve your partner. If considering this please reach out to us and talk though the cost/benefit as well as the overall process to do this.
The first step in getting started is to have a plan. Get started at least one month before your planned cost roll-up. It’s recommended to break the standard cost roll-up process into two silos; purchased items and produced/assembled items. Let’s start with the purchased items, as this takes more analysis time and manual updating.
Here are several decisions you will want to think about as you are building your plan.
Purchased Items:
- Have you received all price updates from your vendors, and will this be the basis of your standard?
- Pull a report of Posted Purchase Invoice Lines table: Purch. Inv. Line (123). This is a great way to better understand how your purchase prices have changed and will help determine if you want to use the last purchase price, or possibly increase your standard to hedge for mid-year increases in purchase prices.
- Will you be adding estimates for landed cost, duty, etc. to your standard? More on how to do this later.
Manufactured Items:
Will you be adjusting your Work Center and Machine Center Costs? Here is how we typically categorize the costing options on Work and Machine Centers:
- Direct Unit Cost: Value added direct labor cost per hour/minute and does not include production overhead costs and fringe benefits.
- Indirect Cost %: Fringe benefits like 401k, health benefits and vacation. Indirect cost is calculated as a percentage of Direct Unit Cost and is typically anywhere from 20% to 40% of wages. The best part of using indirect cost % is you will not need to make adjustments year over year as this is tied to increase in your direct labor standard.
- Overhead Rate: Rent, Utilities, Supplies, Maintenance, depreciation admin and warehouse salaries to name a few.
Will you be updating runtimes on routings and are you using or thinking of adding setup, wait and move times? Note that you have the option to include setup times in your cost, This option is found in the Manufacturing Setup. Keep in mind if you are using setup times, you will need to also implement Lot Size on the item card. Lot Size on the item card is what Business Central will use to prorate the setup costs across the typical production batches or runs.
Let’s talk about landed cost on Purchased Items
Often, companies we work with want to increase the standard cost value for Purchased Items to account for landed cost. While it can seem easier to simply inflate the standard cost value to account for landed costs, it will be difficult to accurately report on landed cost variances. The better option is to leverage the Overhead Rate on the item card for this.
NOTE: While it would make sense to use the indirect cost % if you were for example accounting for 10% of the purchase price, the posting gets…let’s just say weird.
You will also need to calculate the standard cost manually. Here is an example:
Let’s say for a given purchased widget we want to set the purchase price to $100 for standard, and a 10% estimate or accrual for landed cost. The standard cost will be $110 and the overhead rate will be $10. In base Business Central, there isn’t a great place to store the purchase price used for standard (In this case $100), so it’s always a good idea to add a custom field to the item card for “Standard Purch. Price”. You will thank yourself later for this!
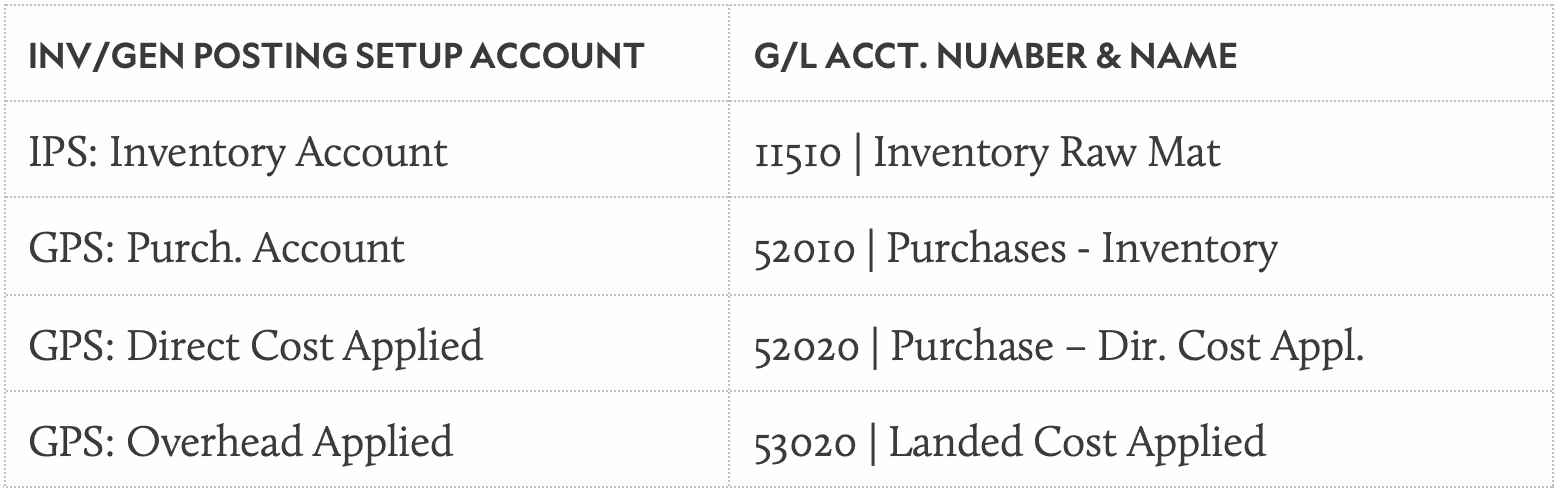
Once you have set this up, you can now drive the posting of your landed cost applied to a separate G/L Account by setting the Overhead Applied account in the Gen. Posting Setup for the item’s Gen. Product Posting Group.
Here are the accounts that will be hit when using this method. Let’s leave out the Purch. Price Variance, Inventory (Interim) and Invt. Accrual Acc. (Interim) for the sake of simplicity:
Here is how the G/L Postings will flow. We left out the other balancing and variance G/L Entries for the sake of simplicity.
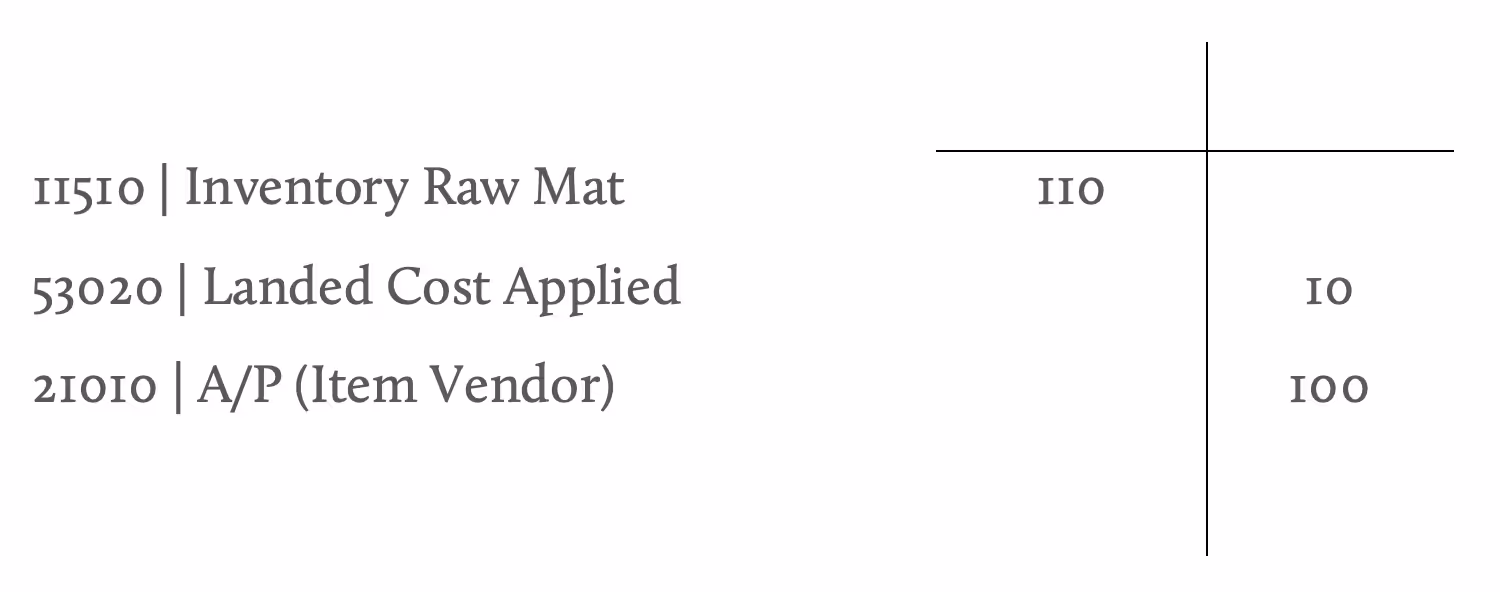
This will now allow the posting of the Purchase Invoices for the landed cost to a Landed Cost Actual account and the net of the Landed Cost Applied and Landed Cost Actual is your landed cost variance.
Time to start executing
Okay, let’s get back to the process at hand. Now that we have a plan on how the standard costs will be constructed; it’s time to start on the order of operations. First, let’s make sure you have created a fresh sandbox or test database to start updating and testing. This is an important step that allows you to update all the factors that make up your standard costs or as we refer to it as cost shares. Performing a test run of your standard cost roll up, will (a) ensure you have all your cost shares where you want them (b) give the leadership team an idea of the overall impact to the inventory valuation, and (c) a clean database for your master data when it comes to updating your cost shares.
Here are some setups you will want to perform:
- It’s always a good idea to create several batches in the Standard Cost Worksheet to manage the process. Simply have at least one batch for purchased items and one batch for produced items, but you could also create more granular batches for say Item Categories. This all depends on the complexity of your Item master.
- Create Config Packages for each Standard Cost Worksheet batch using the table filters on the Config Package.
- Create a Config Package for updating your Work and Machine Centers.
- Create a Config Package for updating Routing Lines. It’s always good to pull the Routing Header and Lines in the Config Package since you will need to change the Routing Header status to ‘Under Development’ to make changes and change the Routing Header Status back to ‘Certified’ before you can roll-up the standard costs.
- Create an Item Revaluation Journal Batch to use once you have completed the roll-ups and need to revalue your on-hand inventory
- Create a Config Package for Items with a filter for items with a Replenishment Method of ‘Purchase’. You will need this if you are populating a custom field to store ‘Standard Purch. Price’ as discussed in the Landed Cost section above.
Now for the process of updating everything via the Config Packages you’ve created:
It is highly recommended that you don’t update either the ‘Standard Cost’ value nor the ‘Overhead Rate’ value by directly modifying the item card. It is a best practice to make all these updates using the Standard Cost worksheet. If you update these fields and don’t run the Standard Cost Worksheet, the cost shares fields in the Item Table that are not exposed in the UI that run the standard cost engine will not be updated, nor will the inventory be revalued.
Make sure you have checked all your Gen. Prod Posting Setups are correct, and ensure your items have the correct posting groups and other setups. Warning: If you see an incorrect Inventory Posting Group on an item card, be very careful in changing it if there is on-hand inventory. Definitely consult your partner before you change this, it can get very ugly if you don’t perform this correctly when moving balances.
Now that you have done your analysis, you want to ensure your costs are all adjusted by running the Adj. Cost-Item Entries job with Post Cost to G/L selected,
Setting Standard Cost for Purchased Items:
- Populate the Purchased Items Standard Cost Worksheet Batch by running the Suggest Item Standard Cost. This should only pull in items with a Replenishment Method of ‘Purchase’ and items with a Costing method of ‘Standard’, however, it’s not a bad idea to set them as filters when running this action.
- Export the Standard Cost Worksheet via the Config Package you made for the Purchased batch.
- Populate the ‘New Standard Cost’ value with the standard purchase price and overhead rate added together and populate the ‘New Overhead Rate’ with the overhead rate value for landed cost. If you aren’t estimating landed cost, you can just populate the ‘New Standard Cost’ with your desired value.
NOTE: While there are options to use the Suggest Item Standard Cost to increase values with a blanket percentage, we have always found it better to use Config Packages. I guess when it comes to analyzing and updating data in BC, we Excel at it. Ok OK, sorry…I’ll show myself out. Cool if I grab my jacket first? - Once you have completed step 3, load your Config Package and apply.
- Search for the standard Cost Worksheet and perform a quick check on the Purchased Batch to make sure the data looks correct. It’s always a good idea to export the batch to excel and save it.
- Now it’s time to execute the changes by running the Implement Standard Cost Changes. It is very important that this step is not skipped, and best if you perform it right way. Select the preferred Item Reval Template and Batch and hit OK.
NOTE: The Posting Date matters here. It is best to post the Revaluation Journal ASAP. If the on-hand Item quantities change after the Revaluation Journal is created, you will need to adjust those quantities before you can post the journal. - Search or navigate to the Item Reval Journal and post the Batch that was populated from the Standard Cost Worksheet.
NOTE: It’s never a bad idea to export the journal lines and save the Test Report. The leadership team will thank you for this later!
Rolling-Up Standard Cost for Produced Items:
- Search for the standard Cost Worksheet and perform a quick check on the Produced Batch to make sure the data looks correct. It’s always a good idea to export the batch to excel and save it.
- Run the Roll Up Standard Cost action to pull in all the produced items using the previously set standard costs for purchased items. If you have sub-assembly items as part of your production processes, the Standard Cost Worksheet will automatically calculate the production levels all the way up to level 0 for you. There is no need to perform the actions for sub-assembly items prior to finished goods items.
- Now, just like for the purchased items, perform the same steps staring at step 6 from above.
We saw that customers were keeping track of historical costs in excel to before kicking off this process. So we developed a free, yes FREE, app for Business Central to track historical standard costs and standard cost details per item. This saves a lot of work tracking this in excel, outside of BC. You can find it in AppSource by clicking the link below.
It can be useful to post inventory adjustments to different accounts based on the reason for the adjustment. We have created a FREE App to help with this as well. The link to the Advanced Inventory Adjustments App for Business Central can be found on Microsoft’s Appsource.
We hope this blog was of use to you. Check back for upcoming topics including: I went live now what and how to drive process change during an ERP implementation.
Ternpoint Solutions is a Microsoft Dynamics 365 Partner. We would love to hear from you, reach out using our contact us page.
Reach out to learn more about what we can do.
contact us
